Building Blocks: Ox-Hugu, Magit and Netlify
I’ve made a substantial change to the blog, and if you haven’t noticed anything, it means it was successful. In this post, I’ll try to capture what I did with Netlify, Magit and ox-hugo to make it happen.
The Problem
My blog has two sections: Author (which is a little about me) and TAONAW (about this blog). Up until recently, I also had another accidental section, helpdeskheadesk, which contained all the blog posts. Two weeks ago, the link to this post would be helpdeskheadesk.net/helpdeskheadesk/2022-02-19. That middle part is what I wanted to get rid of for quite some time.
I knew that moving all the posts up a level might break up the site and break all the internal links in my posts with it. Further, changes I make may not reflect on the local hugo site, but only after I push them to my domain and see them there.
Before I go on, let’s talk a bit more about how this blog is constructed.
Ox-Hugo: Where it Starts
All my writings for the blog start in an org-mode capture template for ox-hugo. Here’s how it looks like:
** TODO %^{Title}
:PROPERTIES:
:EXPORT_FILE_NAME: %(format-time-string "%Y-%m-%d")
:EXPORT_HUGO_PUBLISHDATE: %(format-time-string "%Y-%m-%d"):
:END:


#+hugo: more


**** Footnotes
Both EXPORT_FILE_NAME and EXPORT_HUGO_PUBLISHDATE are ox-hugo properties which roughly translate to Hugo’s publishDate and then the name of the .md file, which in turn will become the html file for the post. You will notice the date on a post and the date in the file name are different. This reflects my workflow: the date in the filename is the date I used my capture template and started writing about something, while the date on the post is the date the post went live on the blog.
There’s another property which is no longer on the capture template: EXPORT_HUGO_SECTION. This property creates the subsection you see in the URL. Both Author and TAONAW section are created with this property, so that they are separate from the main blog in their own sections.
When I first created the blog, I set EXPORT_HUGO_SECTION to “helpdeskheadesk” because I thought I had to specify the main section of the site, telling the posts where to go. That’s not needed, and it’s what caused the additional “helpdeskheadesk” I mentioned above.
The solution was to go back and remove all EXPORT_HUGO_SECTION properties from my posts, which also meant to re-publish the entire site from ox-hugo. At this point, you can probably imagine why I got nervous doing this live earlier on.
Netlify: Where it Happens
my blog is built with Hugo. Back when I started, I used to run hugo locally to create the .md files needed for the posts on Emacs with ox-hugo and then push everything (including my hugo binary, I was too worried about messing my git folder which included it inside) that way. Over time, I gained more confidence and with some poking from kaushalmodi, the creator of ox-hugo, I gave Netlify a try.
Netlify is an online service that runs blog publishing software for free, like Hugo. I don’t need to worry about creating my blog locally and then push it to GitHub (which turned to GitLab later on): Hugo can publish my .md files on Netlify instead1. Not just that: Netlify keeps a local instance of my files, effectively becoming my host, at no cost to me2.
Since Netlify is connected directly to my GitLab account, all I need to do is to push my changes to GitLab. Netlify detects the changes, creates a Hugo instance on the spot (up to the newest version, depends on what I specify), and rebuilds my blog. All that’s left for me to do is to direct my domain registrar to Netlify’s servers so you can see this webpage when you got to helpdeskheadesk.net.
Back to the problem then. When I finished correcting the structure of the blog, I wanted to see how the site would like on my domain. This meant I couldn’t use a local instance of hugo, since it would not replicate my domain structure correctly. I needed a staging site.
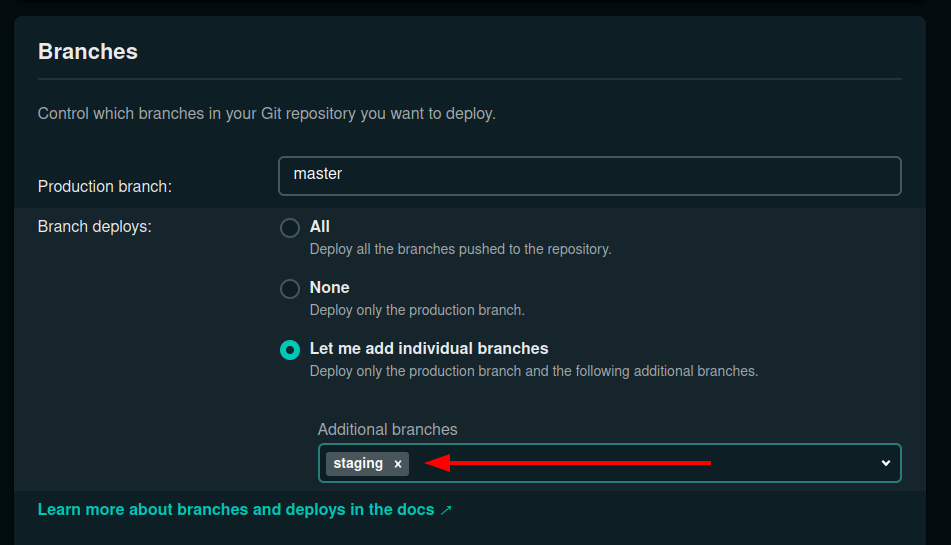
Fortunately, this is easy to do with Netlify. Netlify can record every push from the git repository it’s connected to, but it only takes notice of the master branch by default. This make sense, since the master branch should (by default anyway) be the live site. To tell Netlify to start recording another branch, you can expand its Branches setting and manually add any branches you want it to take note of:
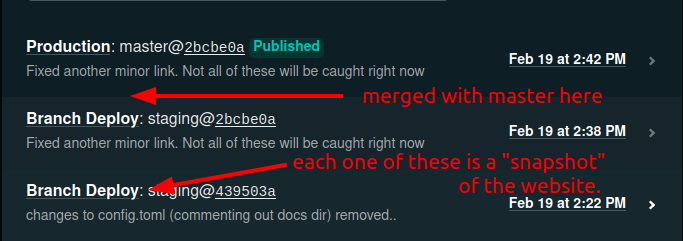
You could work further and register an additional subdomain for your staging site, but this is not required since Netlify collects deploys, “snapshots” of the website, each time you publish it for each branch you ask it to grab. I can go back and browse my different commits and see how the website looked at that date live instantly, without needing to checkout anything from GitLab.
In the case above, I needed to look at my deploys on the staging site (which are only live on Netlify’s server) until I was satisfied with what I saw. I made a dozen deploys that day until I finally merged with the master branch again:
Magit: Conquering Fears
I’ve discussed learning git, but it’s only recently that I’ve made a change and used Magit to get things done. As a visual person, I am quickly learning to appreciate how Magit present git information. But there’s more.
Because magit shows me what options are available directly from the status menu, it also teaches me more about git. Magit made it easier to look back at my logs and find my staging branch, which was a couple of weeks old at this point, and see what was the last thing I’ve done there. That told me that in order to use the staging branch again, I need to update it to where my blog is now (merge it with the master branch) and then checkout the staging branch again to do the changes I was talking about above. It was as simple as moving up and down headers in org-mode. It was something that was impossible for me to do a couple of months ago.
I would be more confused about what to do if it wasn’t for Magit. While I have an idea of the git commands I needed to do, I wouldn’t know when to use them and why. Magit provided this context.
End Remarks
The site is live now with the new structure. You might find duplicate posts or broken links; if you do, please let me know so I can fix those. Having my blog built like this into org-mode (with ox-hugo) means that I have a static-dynamic website: while the html pages are static and the files are re-built each time I make a change, I can see my posts in an org-mode file which is as natural to look at as projects on my agenda. I constantly include new ideas, revamp old ones (and fix typos), and as I showed here, make large-scale changes.
Let me know if any of this makes you curious. While I’m farm from expert, the links here should direct you in the right direction, or, hopefully, I could.
Footnotes
-
As I was writing this post, it occurred to me that perhaps I don’t even need to push over the .md files. What if ox-hugo, which converts my org files to .md files, was also stored on Netlify? Turns out this option exists. In a nutshell, since Netlify have Emacs installed as an option (because they’re awesome), you can automate ox-hugo from there using a script. This is a bit over my technical abilities at the moment, but fascinating to know just how far you can go with this. ↩︎
-
In the past, I would run WordPress blogs with different hosts who charged me a fee each month. I didn’t know how to handle domains either, so I had the host usually take care of that as well. Today, my blog is more stable, light, and much more independent. I wish more people would use this knowledge to write their own blogs! This is one of the benefits of learning how stuff work, and I’m grateful for the folks who helped me along the way. ↩︎